


How to Make Your Own Soap - Soapmaking Part 1

 Soapwort: Saponaria officinalis
Romans and Greeks were known to clean themselves by using water and ashes, sand or pumice and then anointing themselves with oil. The ruins of Pompeii (destroyed in 79AD) reveal an entire soap factory! So, somewhere along the line, people started using soap for personal hygiene and as a preventative for disease. There are records that in the 2nd century AD, a Greek physician, Galen, recommended washing with soap for this reason. By the 8th century, soap was being made in Italy and Spain from goat tallow and beech tree ashes. By the 13th century, Italy and France were centers of soap-making, bringing soap into the forefront for use in bathing, laundry, shaving and shampooing. Of course, the Castille area in Spain is famous for making the first hard, white bars of olive oil soap - still made today as castile soap. I will be sharing a recipe that is my favorite.
Out of Ashes....Lye!
So I have not done it yet, but I plan to try to make a soap mixture of some sort using ashes from our woodstove this winter, lard that I rendered last winter and water - and see what happens. I will definitely do a post when I do that. What I love about that idea is that it is simple and made with ingredients that I won’t have to purchase. I have movie-images of people outside stirring big bubbling kettles of soap for hours and I wonder if that is accurate. I intend to find out....

But for now, I want to share with you my experience in making some simple homemade soaps. My mission is to make the most luxuriant lathering and moisturizing soap that I can possibly make, while keeping the bar hard and long-lasting. (This is a challenge, so I’ve been told because the more luxuriant bars tend to dissipate more quickly.) I needed to start at square one, being a complete novice at soap-making. So my husband bought me a book for Christmas, called Milk Soapmaking by Anne L. Watson and I began to assemble the tools I would need to successfully make soap.
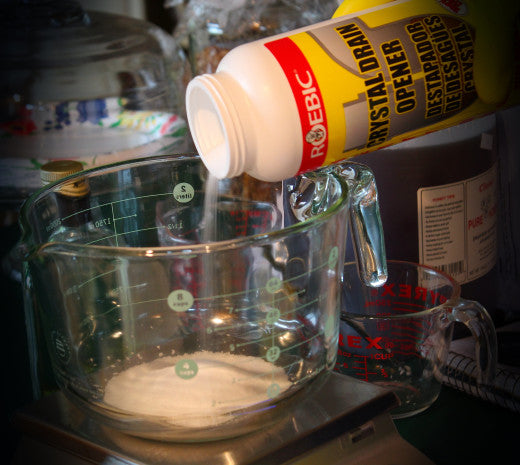
Materials Needed
It was a bit overwhelming for our extremely tight budget, but I finally managed to acquire some lye (I just purchased Roebic drain cleaner at Lowe’s - you have to get 100% sodium hydroxide and this is a bead form of lye which is what you need to use for milk soaps), various oils and fats, an instant-read digital thermometer, a digital scale that tares, an immersion stick blender, goggles, rubber gloves, various stainless steel pots (no aluminum!), a glass pitcher with a spout, containers for measuring ingredients, and then pans for pouring the soap into to set and parchment paper to line those pans so you can get the soap back out! (My first mistake) You also want to make sure any spoons you use are stainless steel or plastic. She also recommends getting pH strips to test the alkalinity of your soap. I got some but haven’t used them yet. You need ones that measure the range of 7 (neutral)-11(too alkaline to use). I’ve been letting my bars sit for 3 months before using them. Let me preface my experience by saying that I was attempting to make soap with certain qualities and appearance of the soap meant nothing to me. I totally did not care to fuss with making my soap beautiful. Functional and effective was what I was after. So you wouldn’t look at my soaps and salivate.
Cold-Process Milk Soap  I started out with a basic, cold-process milk soap. I had some raw milk go sour and so I decided this was a perfect use for it. The lye kills everything, so it totally doesn’t matter that it was soured. I poured the soured milk into 9 ounce portions in ziploc bags and layed them flat in the freezer. You need the milk to be frozen when you use it for your soap to manage the temperature of the lye mixture. Using it frozen is a great boon to getting your mixture to the temperature needed to add the fats more quickly. Here’s the recipe I used: 9 ounces (255g) coconut oil 21 ounces (595g) olive oil 9 ounces (255g) fluid milk (frozen) 4.1 ounces (116g) lye *Remember, this is a cool technique soap. (Differs from the warm technique in the form of milk used and the making of the lye solution.)
Ready, Set, Soap!
Get all your materials ready and dress to prepare for splashes. (long sleeves, gloves, etc.) Keep the kids occupied. Seriously - if your children are undisciplined, do NOT make soap around them. You cannot be interrupted and they must not be permitted to be anywhere near the lye. Wear your goggles! I have proven their effectiveness after only 3 batches of soap! Also...lye fumes are toxic. Decide where you will mix your lye solution. If you can mix your lye solution outside, do it. Some folks do it on the stove with the exhaust fan on, or go near an open window. Do NOT breathe in these fumes! (They are much worse with a warm technique soap.)
Step 1: Turn on your scale. Put your pot on the scale and push the tare button. Measure the coconut oil into the pot. Tare again. Add the olive oil. Gently heat until coconut oil melts. OR melt premeasured coconut oil in the microwave and then add it melted to the pot. Set aside the fats.

Step 2: Put a dry measuring cup on the scale for measuring lye. This should be a cup you will use exclusively for lye. Measure lye into the cup very slowly so as to not overshoot and have to pour any back. The beaded lye likes to travel about.
Step 3: Put the frozen milk into your pot or glass pitcher.

Step 4: Gently pour the lye on top of the milk, stirring carefully with your long-handled slotted spoon. Avoid splashes! (*Note: Never, never, never pour lye in first and add liquid on top of it!! Imagine a volcano....) Don’t worry about any changes of color or if it gets grainy(happens with lowfat milk, but why would you use lowfat milk when high fat makes such a nicer soap?) or thickens- it’s all fine.

Step 5: Determine when your lye is dissolved. Take the temperature at the start and keep a watch on it as you stir. When it begins to definitely fall, your lye is dissolved. UNLESS you’re making a really high-fat soap, (which this recipe is not) where the fats cause the temps to keep rising - in this case, you’d just stir for a good 5 minutes to be sure it is dissolved. How to tell if you have enough fat to expect the temps to rise or fall? If the mixture is thickening as you stir, expect it to keep rising. If it stays thin, the temps should drop.


Step 6: Time to combine! Add your lye mixture to the melted fats in the pot by pouring it through a sieve. Again, this sieve should be exclusively for soapmaking. If you used high-fat milk, it might be too thick to pour. That’s okay - just spoon it in. Stir with the long-handled spoon until mixed.

Step 7: Add any fragrances (essential oils are best. I learned that orange oil doesn’t last at all.) or colorants (I wasn’t bothered.).

Step 8: Check your temperature and note it. Step 9: The tricky part. Immerse your stick blender into the mixture and blend. (Make sure you keep it submerged or you’ll have a big mess to clean up!)

Watch the mixture change forms until it becomes thick and creamy. When your blender sounds like it’s working harder, turn it off and stir your soap with a spoon for about half a minute. If it thins again (false trace) use the blender some more. What you’re going for here is what soapmakers call ”trace.” It’s where you see a trace of the movement of the blender through the mixture as it’s thickening up. The temperature will also go up a couple degrees from the heat generated by saponification. If this happens, you want to be done and pour your soap into the mold. Do not let it go any higher than 5 degrees from the starting temp.

Step10: Refrigerate for at least 3 hours or you can freeze for 1 hour and then move to the ‘frig to get it as pale as possible. Then move it to your countertop or some other room temperature place to cure.

Step 11: After 12-24 hours pull the soap out of the mold.
Step 12: Test your soap. Put on your rubber gloves. Drop a bit of distilled water onto the setting soap and work it in a bit. Press in a ph strip. If the reading is high (11-12), wait until it reads around 7-10.
Step 13: Cut into bars and let cure. Use a cheese wire, a knife, a pizza wheel, whatever works for the mold you chose. If it seems to want to chip, maybe wait another day to cut the bars. Be on the alert for any lye granules as you cut. If you see any, test with a pH strip and if it’s lye, you’ll have to ditch the batch. The soap should be uniform and creamy. Let the bars cure where they can get good air circulation. I just put mine on a lined old cookie sheet and turned them over every day.

Leave a comment