


DIY Portable Water Filter - How to Filter Water in an Emergency

Clean drinking water is absolutely essential with survival in any situation. So let's make your an improvised portable water filter out of a water bottle and a few materials that you can scrape together just about anywhere.
When I did this for my video quick tip, I filtered some really nasty water, and drank it.
Materials To Gather To make our water filter, we need a few things:
- A knife.
- A container. I just used a Gatorade bottle, because I normally have one around, and I like how strong they are. The way that they mold the plastic just makes for a stronger bottle in my opinion. I do have some regular water bottles, and you could use them also. What I’m going to show you is completely scalable, so you could use a 2 liter bottle, or a big ol’ 5 gallon bucket.
- Coarse stone.
- Fine stone.
- Fine sand.
- Coarse sand.
- Charcoal - probably the most important ingredient.
- Rubber bands (I used 2). However, for what I used the rubber bands for, we could have easily used some wire - some 20-24 gauge wire, which is something I normally carry in my bug-out bag or backpack - or some paracord. But because I have them, and I normally carry them anyway, I’m going to use rubber bands to make things a little bit simpler.
- A couple of pieces of cloth. In my video, I just used some cotton cloth in my example, but in my permanent filter I use polyester because cotton stays wet longer and gets moldy more easily. Polyester will dry out more quickly to inhibit mold growth.
- Water to purify.
Let's Build a Water Filter
First, you will cut your Gatorade bottle towards the bottom - cutting off the whole bottom half-inch or so. If you cut it just right, you could probably use it as a cap or lid and secure it on there. 
The next thing to do is to put your bottom filter on, which is just going to be a piece of cloth. It could be a bandana or even a piece of foam - pretty much anything. Just wad it up and stuff it in the water bottle, toward the neck of the bottle/bottom of the filter, making sure it’s nice and tight. 
Next, get your charcoal and dump it onto another piece of cloth. Fold the cloth around the charcoal, and, using the blunt side of an axe or a rock, break up the charcoal (I got mine from a fire-pit) pretty well, making smaller chunks.
Charcoal is very porous. It absorbs a lot of nasty stuff, and you can’t really do a water filter that’s very effective without it. It’s going to take a lot of all the bad stuff out. 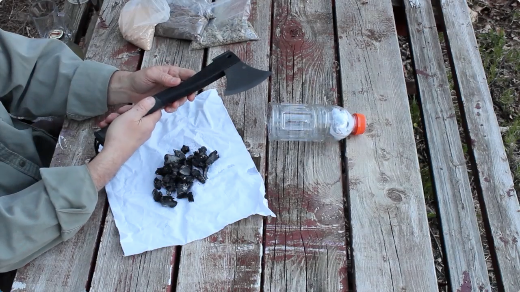 When you’ve sufficiently broken up the charcoal into small bits, put it into the bottle you’ve prepared, on top of the bottom filter cloth.
Next, put in the fine sand. From this point, after you’ve put in the bottom filter and charcoal, you’re going to go from finest material to thickest. You don’t need any kind of fancy sand...just playground sand will work. 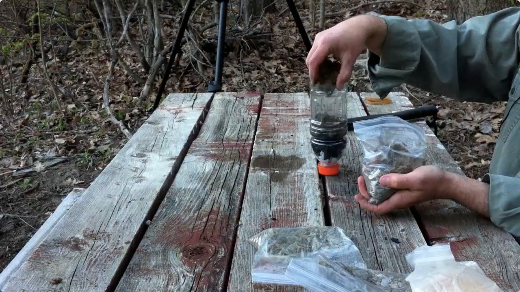 Now add some coarse sand. There will be a little bit more of the “small rock” type of material in this. What I used was paver sand. A handful or two should do it.
Next you're going to use your fine stone. I got mine from a drainage area where water runs down off the mountain. 
And last, you will use your coarser, more angular stone, which I got off the top of the same drainage area. 
Now grab another piece of cloth/old bandana, etc., to make a filter on the top. Drape it over the top of the bottle, and secure with a rubber band/wire/paracord etc. 

Now you can take the cap off the bottom, and you’re ready to filter some nasty water! 
Let The Filtering Begin!
Put your bottle/filter into a cup different from the one you’ll be drinking out of, and pour some of the dirty water through it. 
Technical Details
The first water that you get after straining it through will still be pretty nasty, to be honest...and a lot of the dirt you might see in your cup will be from the stone you collected.
So....throw that first little bit of water out. (If you rinsed your filtering materials before using them, this could potentially help quite a bit.)
Now get a new cup, and pour some more water through your filter, holding it over the cup. Make sure as you’re doing this to be very careful not to get your tainted, dirty water into your clean water cup.
Now this all will take a bit of time (7-10min for a cup or so), and of course, a bigger filter will produce more water faster.
To be honest, you can probably do this without the last cloth you put on top just to speed the process up a bit...
Don't Forget to Purify!
One thing I have to mention is that this process is just filtration, not purification....so you would still want to use iodine tablets or you need to just boil the water, because that will take care of the “nasties” that are alive.
So always make sure that you boil your water after you filter it...I recommend a rolling boil for no less than 3 minutes.  Another tip is to rig some wire to the top to hang your filter from a tree or something so you don’t have to hold it the whole time you’re waiting for the water to filter through.

Leave a comment